
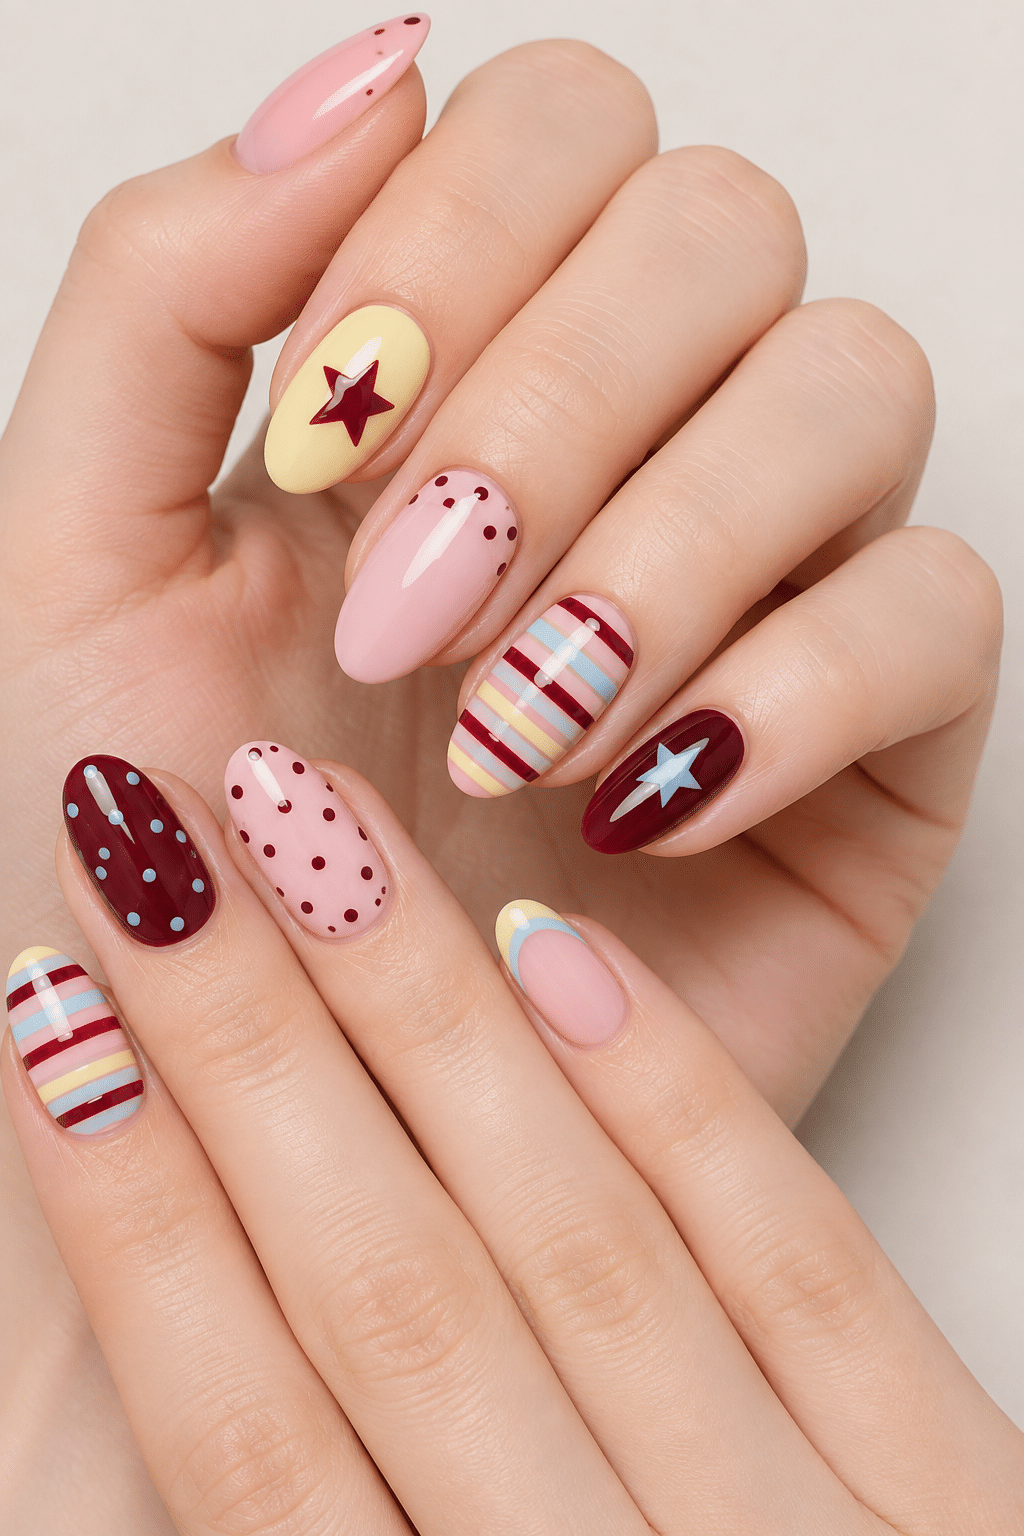
Retro Mix & Match Nails are perfect for anyone who loves playful color, vintage-inspired patterns, and a manicure that never feels boring. The design in this image combines soft pink, deep cherry red, buttery yellow, pale blue, polka dots, stripes, and bold star accents in one coordinated set. Instead of repeating the same style on every finger, Retro Mix & Match Nails create personality through contrast while still looking polished and intentional.
What makes this manicure especially appealing is the way every nail feels different, yet the colors connect the whole look. You get tiny dots, graphic stripes, glossy solid shades, delicate curved tips, and statement stars without losing balance. Retro Mix & Match Nails are ideal for people who want something cheerful, feminine, and slightly nostalgic while still feeling modern enough for everyday wear.
Why This Retro Nail Trend Works
The charm of Retro Mix & Match Nails comes from controlled variety. A mix-and-match manicure can easily look too busy if the colors or patterns compete with each other, but this design uses a limited palette to keep everything cohesive. Pink acts as the soft base, deep red creates contrast, yellow adds warmth, and pale blue brings a fresh retro touch.
The oval and softly rounded nail shapes also help the design feel wearable. Even though several patterns appear across the manicure, the smooth shape prevents the look from becoming harsh. A glossy finish ties everything together and gives the manicure that clean, salon-quality appearance.
Retro-inspired nail art has a fun emotional quality too. Polka dots and stripes feel nostalgic, while stars add a playful graphic edge. When these details are combined carefully, the finished design looks creative rather than overly busy.
The Color Palette Behind the Look
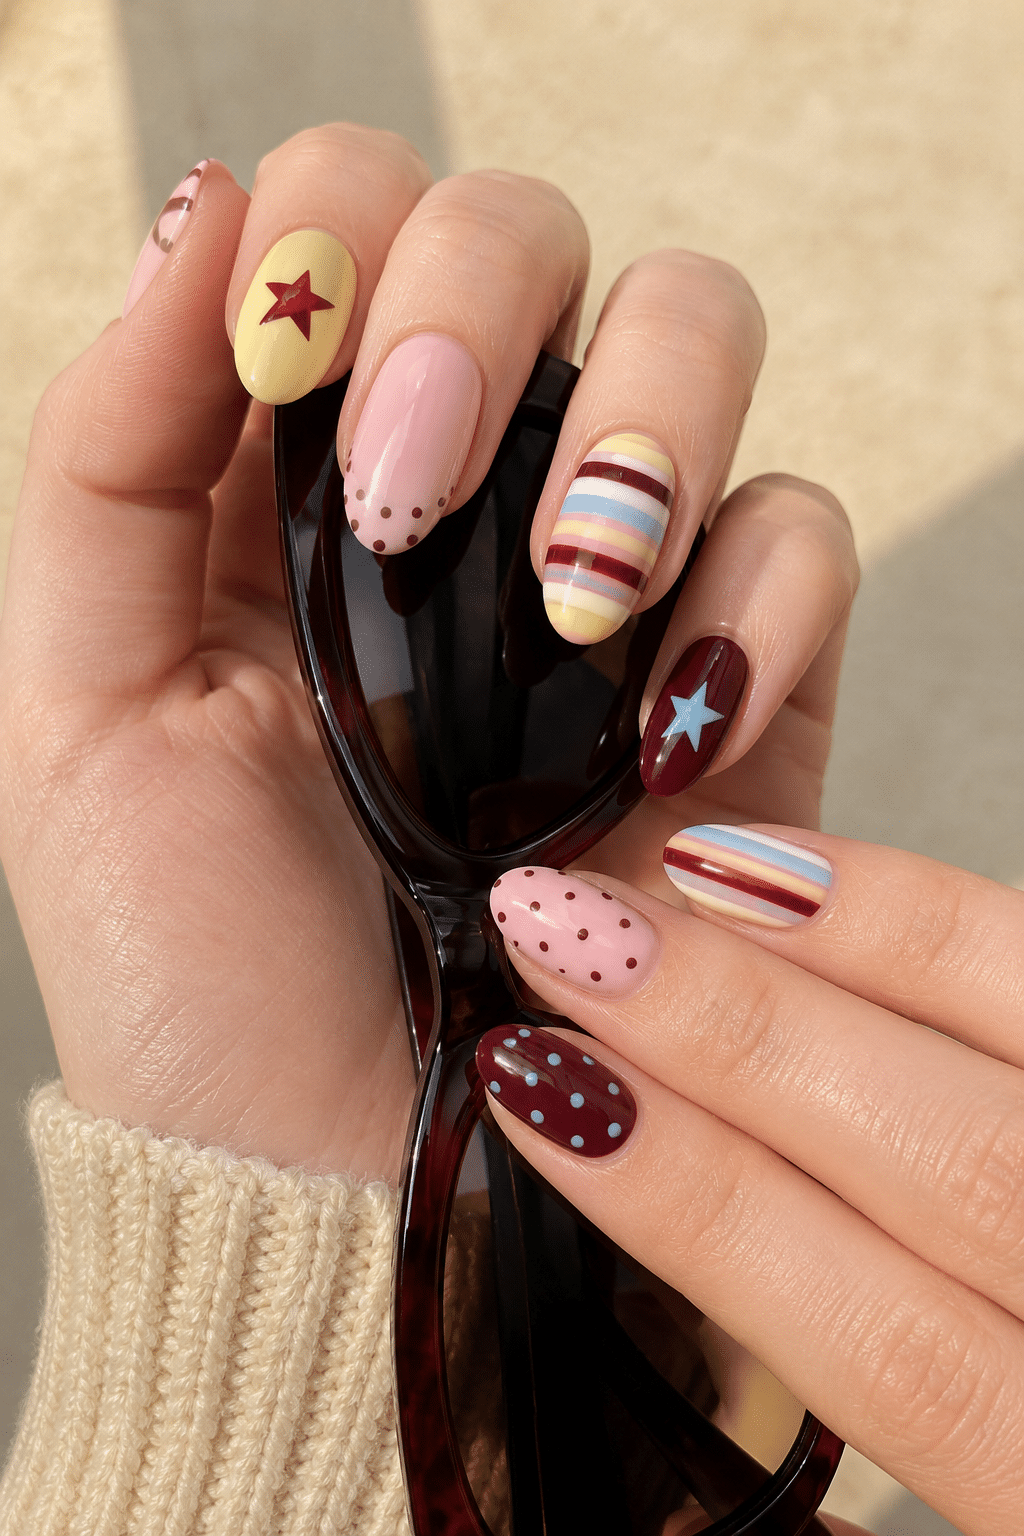
One of the strongest features of Retro Mix & Match Nails is the color palette. The manicure does not rely on one dominant shade. Instead, it blends soft and bold colors that support each other beautifully.
A blush pink creates the main feminine tone. Deep burgundy or cherry red provides drama and anchors the lighter shades. Pale yellow keeps the manicure warm and sunny, while powder blue adds contrast without feeling too bright.
White is used sparingly in the striped details, helping the stronger colors stand out. The combination feels playful but still polished because the deeper red gives the overall design a sophisticated finish.
If you want to recreate this manicure, choose colors with similar undertones. Slightly muted shades usually work better than neon colors when you want a true vintage-inspired effect.
Stars, Stripes, and Polka Dots
Retro Mix & Match Nails are all about combining simple motifs in an interesting way. The stars are the most eye-catching part of this manicure because they create clear focal points. One sits beautifully over a pale yellow nail, while another appears against a glossy deep red background.
The polka-dot nails bring softness and movement. Small red dots over pink and pale blue dots over burgundy create two versions of the same pattern. Repeating a motif in different colors helps the entire manicure feel connected.
The striped nails add the strongest graphic detail. Thin horizontal bands of red, pink, yellow, blue, and white create a cheerful vintage effect. Because these colors already appear on the other nails, the stripes blend naturally with the star and dot designs.
The Best Nail Shape for This Design
Medium oval or softly rounded almond nails are a beautiful match for Retro Mix & Match Nails. These shapes provide enough surface area for patterns while keeping the manicure feminine and comfortable.
Short nails can work just as well. In fact, a short oval shape can make the manicure feel even more authentically retro. If your nails are short, use fewer stripes and slightly smaller stars so every detail remains visible.
Long almond nails can create a more glamorous version of the look. The extra length gives you room for larger stars, negative-space details, or additional stripes without making the design crowded.
Square nails are another option if you prefer something more graphic. Their straight edges can make the striped patterns look particularly crisp.
How to Recreate Retro Mix & Match Nails
Start by shaping your nails and gently preparing your cuticles. Apply a protective base coat, then decide which pattern will go on each finger before painting. Planning the placement first can prevent too many detailed designs from appearing next to each other.
Apply two thin coats of your chosen base shades. Use pink, pale yellow, burgundy, light blue, and a sheer nude or blush color as your main palette.
For the polka dots, use a dotting tool or the rounded end of a bobby pin. Dip it lightly into polish and create evenly spaced dots. Avoid loading the tool with too much product, as this can cause the circles to spread.
For the striped nails, a fine nail-art brush works beautifully. You can also use striping tape if you want extra-straight lines.
Stars can be hand-painted with a detail brush, applied as decals, or added with small flat nail embellishments. Beginners may find stickers easier because they create clean, symmetrical shapes.
Finish your Retro Mix & Match Nails with a glossy top coat. This smooths the artwork, enhances the colors, and gives the manicure a professional salon-style shine.
How to Keep a Mix-and-Match Manicure Balanced
The easiest way to make Retro Mix & Match Nails look intentional is to repeat colors instead of repeating the exact same design. For example, the deep red appears in dots, stripes, stars, and solid sections. This connects the manicure without making every nail identical.
Another useful technique is alternating busy nails with simpler ones. If one nail has several colorful stripes, place a solid-colored or minimally decorated nail next to it. This gives the eye a place to rest.
Try to limit your palette to around four or five coordinated shades. You can still make every nail unique without introducing so many colors that the manicure loses its visual harmony.
Cute Variations to Try
There are many ways to personalize Retro Mix & Match Nails without losing their vintage charm. For a softer version, replace burgundy with dusty rose and use creamy ivory instead of bright white. This creates a romantic pastel effect.
For something bolder, choose a darker cherry red and add navy or black details. A tiny crystal placed in the center of one star can also bring a subtle touch of sparkle.
You could replace some stars with cherries, hearts, flowers, smiley faces, or miniature bows. These motifs complement the retro theme and make it easy to create a manicure that feels more personal.
A French-tip variation is another cute choice. Keep several nails sheer pink and add colorful stripes, dots, or curved sections only near the tips.
When to Wear This Manicure
Retro Mix & Match Nails are versatile because they are playful without belonging to only one season or holiday. They work beautifully for birthdays, weekend trips, brunches, concerts, vacations, casual parties, and everyday outfits.
The combination of pink and red can also make this manicure a fun Valentine’s Day option. You can add one tiny heart without changing the main retro concept.
During spring, highlight the pink, yellow, and blue tones for a softer look. In summer, brighter versions of the same shades can create a cheerful vacation manicure.
For fall, switch pale yellow to mustard and blush pink to dusty rose. During winter, burgundy and cream can become the dominant shades, while the stars provide a subtle festive touch.
Styling the Nails With Your Outfits
Because Retro Mix & Match Nails already feature several colors and patterns, they look especially good with simple clothing. Cream sweaters, white shirts, denim, beige outfits, pink dresses, and burgundy accessories can all complement the manicure.
For a coordinated look, choose one shade from your nails and repeat it in a small accessory. A red headband, pale blue handbag, pink scarf, or yellow earrings can subtly connect your outfit to your manicure.
Gold jewelry works beautifully with the warmer yellow and red tones, while silver jewelry can complement the blue details. Minimal rings and bracelets allow the nail art to remain the main attraction.
How to Make Your Manicure Last Longer
To keep Retro Mix & Match Nails looking glossy and fresh, use cuticle oil every day. Healthy, moisturized cuticles instantly make detailed nail art look more polished.
Avoid using your nails to open cans, packages, or containers. Small patterns such as dots and stripes can show wear more quickly than plain polish, making a strong top coat especially important.
If you use traditional nail polish, apply another thin layer of clear top coat every few days. This restores shine and helps protect the detailed artwork from chipping.
For gel polish, make sure every layer is cured properly and that the free edge of each nail is sealed.
If you use stars as stickers or flat embellishments, secure them carefully and apply top coat around the edges so they do not lift.
What to Ask for at the Nail Salon
If you want Retro Mix & Match Nails professionally done, save the inspiration image and show it to your nail artist. Explain that you want every nail to feature a slightly different design while using the same coordinated vintage-inspired palette.
Ask for shades of pink, deep red, pale yellow, light blue, and white. Request a combination of polka dots, horizontal stripes, stars, and a few simpler accent nails.
You should also discuss how you want the stars created. They can be hand-painted, applied as decals, or made with flat decorative pieces.
For short nails, ask your technician to scale down the patterns instead of removing them. Fewer stripes, smaller dots, and simple stars can recreate the same feeling while keeping the design proportional.
Why This Nail Style Is Perfect for Pinterest Inspiration
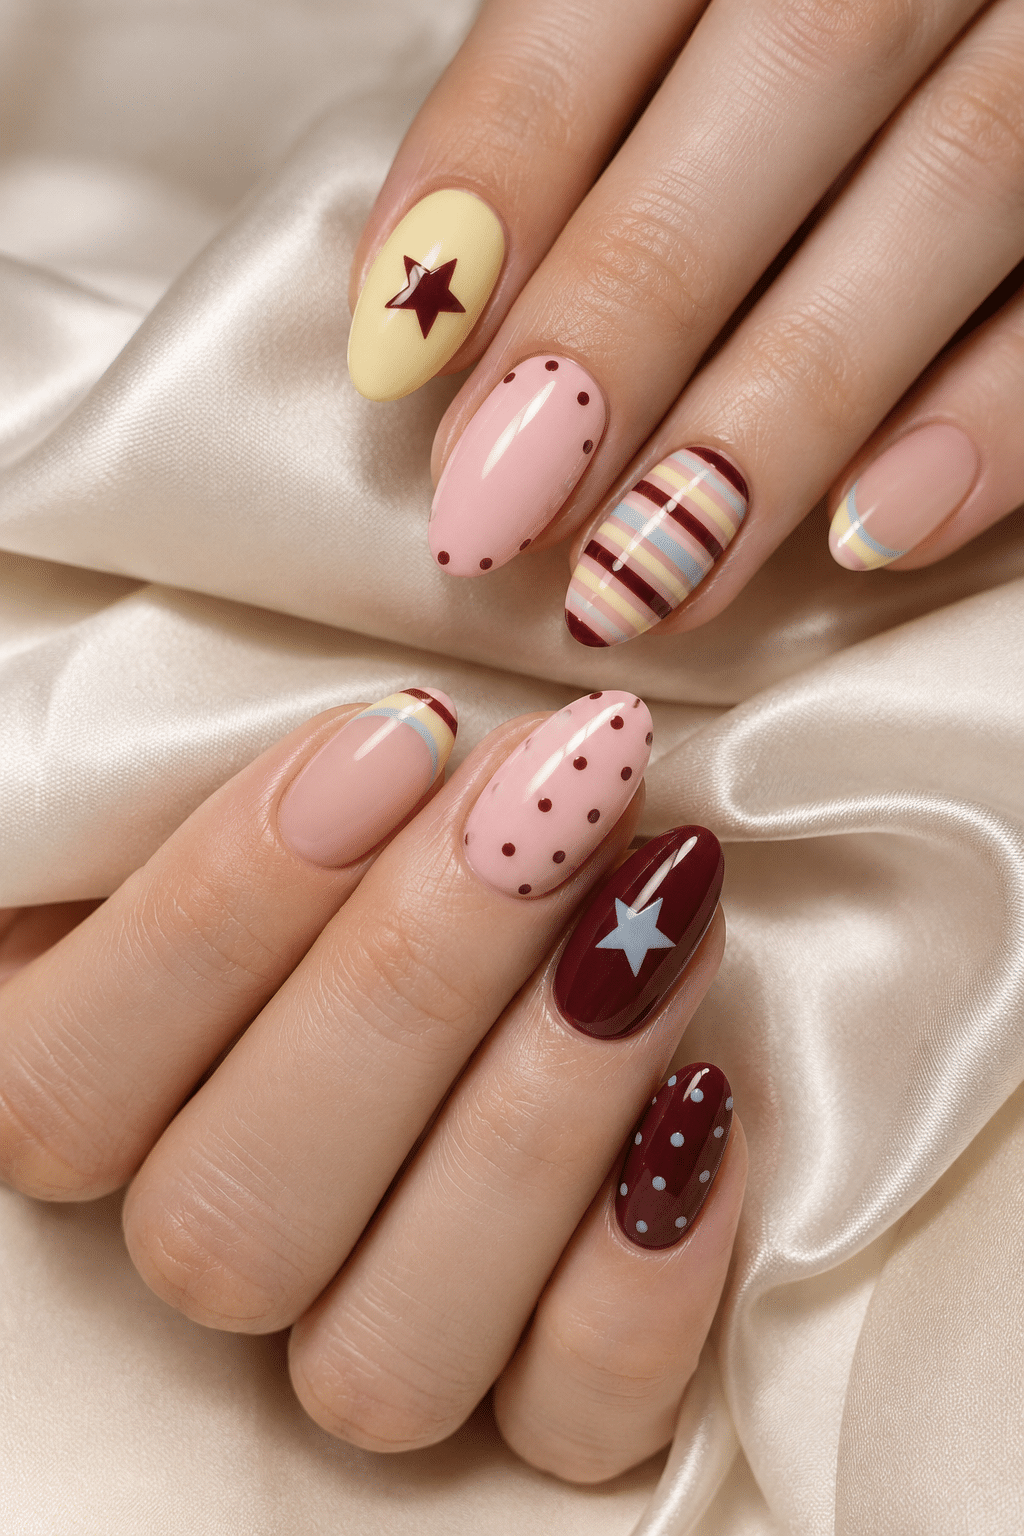
Retro Mix & Match Nails photograph beautifully because every finger gives the viewer something different to notice. The bold stars immediately attract attention, while the stripes, dots, and color combinations encourage people to look more closely at the entire manicure.
The palette also stands out without depending on excessive glitter or neon polish. Pink, burgundy, pale blue, and yellow create enough contrast to look interesting while maintaining a soft aesthetic.
For Pinterest photos, use a neutral cream or beige background and bright natural light. This helps the glossy finish stand out while keeping the patterns clear.
The manicure can also inspire many variations. You can keep the same layout and change only the colors to create different spring, summer, fall, or holiday versions.
Final Thoughts
Retro Mix & Match Nails are a fun choice when you want a manicure that feels creative, colorful, and full of personality. The combination of pink, burgundy, yellow, pale blue, stars, polka dots, and stripes creates a charming vintage-inspired look without feeling dated.
The best part about Retro Mix & Match Nails is that your fingers do not need to match perfectly. Repeating a coordinated color palette is enough to bring all the different patterns together and create a polished finish.
Stars, dots, colorful stripes, curved tips, and glossy solid shades give you endless ways to personalize this manicure. Whether you recreate the inspiration exactly or change a few details to suit your personal style, this playful nail look is worth saving for your next salon appointment.